Connecting OPAF Chat to Oracle Analytics Cloud via MCP

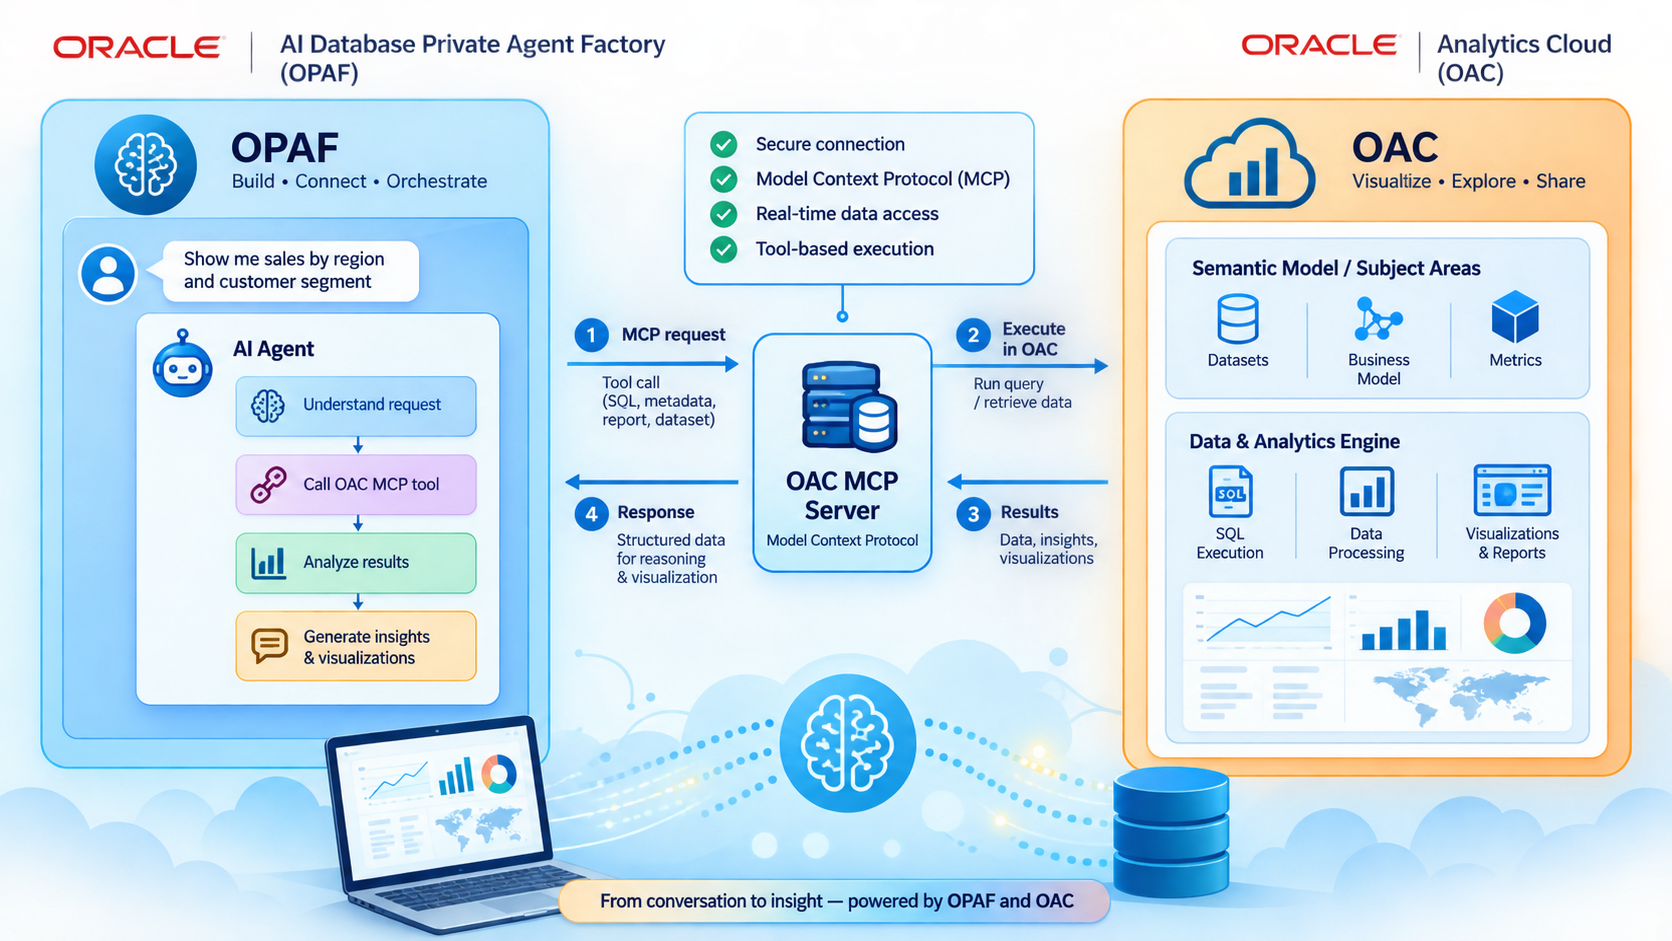
This post explores how to connect Oracle AI Database Private Agent Factory (OPAF) with Oracle Analytics Cloud (OAC) using the Model Context Protocol (MCP). It walks through the OAuth configuration, MCP server setup, and Agent Builder flow needed to let a private OPAF agent query live, governed OAC subject areas. The result is an analytics-aware AI assistant that can discover metadata, generate Logical SQL, and answer questions using trusted enterprise data—without duplicating the semantic model or underlying data.
From Standalone Assistant to Analytics-Aware Agent
I've covered this ground before, in two earlier post series:
- Unlocking Oracle Analytics Cloud with AI: MCP for Oracle Analytics. This is where I introduced the MCP Server for Oracle Analytics Cloud, and how it lets general-purpose AI assistants like Claude query governed OAC data through a standard, secure protocol.
- Oracle Analytics Meet AI series, which expands on that theme and focuses more on the tools available from within OAC itself.
This time I want to close the loop on something I left open: what happens when the AI assistant isn't a desktop client like Claude Desktop, but a private, self-hosted agent platform running entirely inside your own environment?
That's the space Oracle AI Database Private Agent Factory (OPAF) occupies. It's Oracle's private agent platform, deployed and backed by your own database, on-premises or in a cloud tenancy you control. OPAF itself can also run air-gapped, though I should be upfront that this particular OAC integration needs outbound connectivity to Oracle Analytics Cloud, so full air-gap isn't an option here specifically. The agent, the data, and the identity boundary otherwise stay yours. This post walks through connecting OPAF's chat interface to Oracle Analytics Cloud using the same MCP Server from last time.
Why OPAF + OAC via MCP?
OPAF already gives you a private, governed chat agent with its own LLM connections, its own identity domain and its own data behind it. What it doesn't give you out of the box is a way to reason over existing OAC subject areas: the models, hierarchies and metrics your BI team has already built and governed.
Rather than duplicating that modeling effort inside OPAF, the MCP Server lets OPAF's agent call out to OAC directly. A few reasons that matters:
- Queries run live against governed OAC subject areas, so there's no data duplication.
- OPAF reuses the same dimensions, measures and joins your analysts already trust, so there's no re-modeling.
- It's just one more MCP client. The same OAC MCP Server that works with Claude Desktop or Cline also works with a private, internally-hosted agent, wherever that agent happens to be deployed.
Architecture Overview
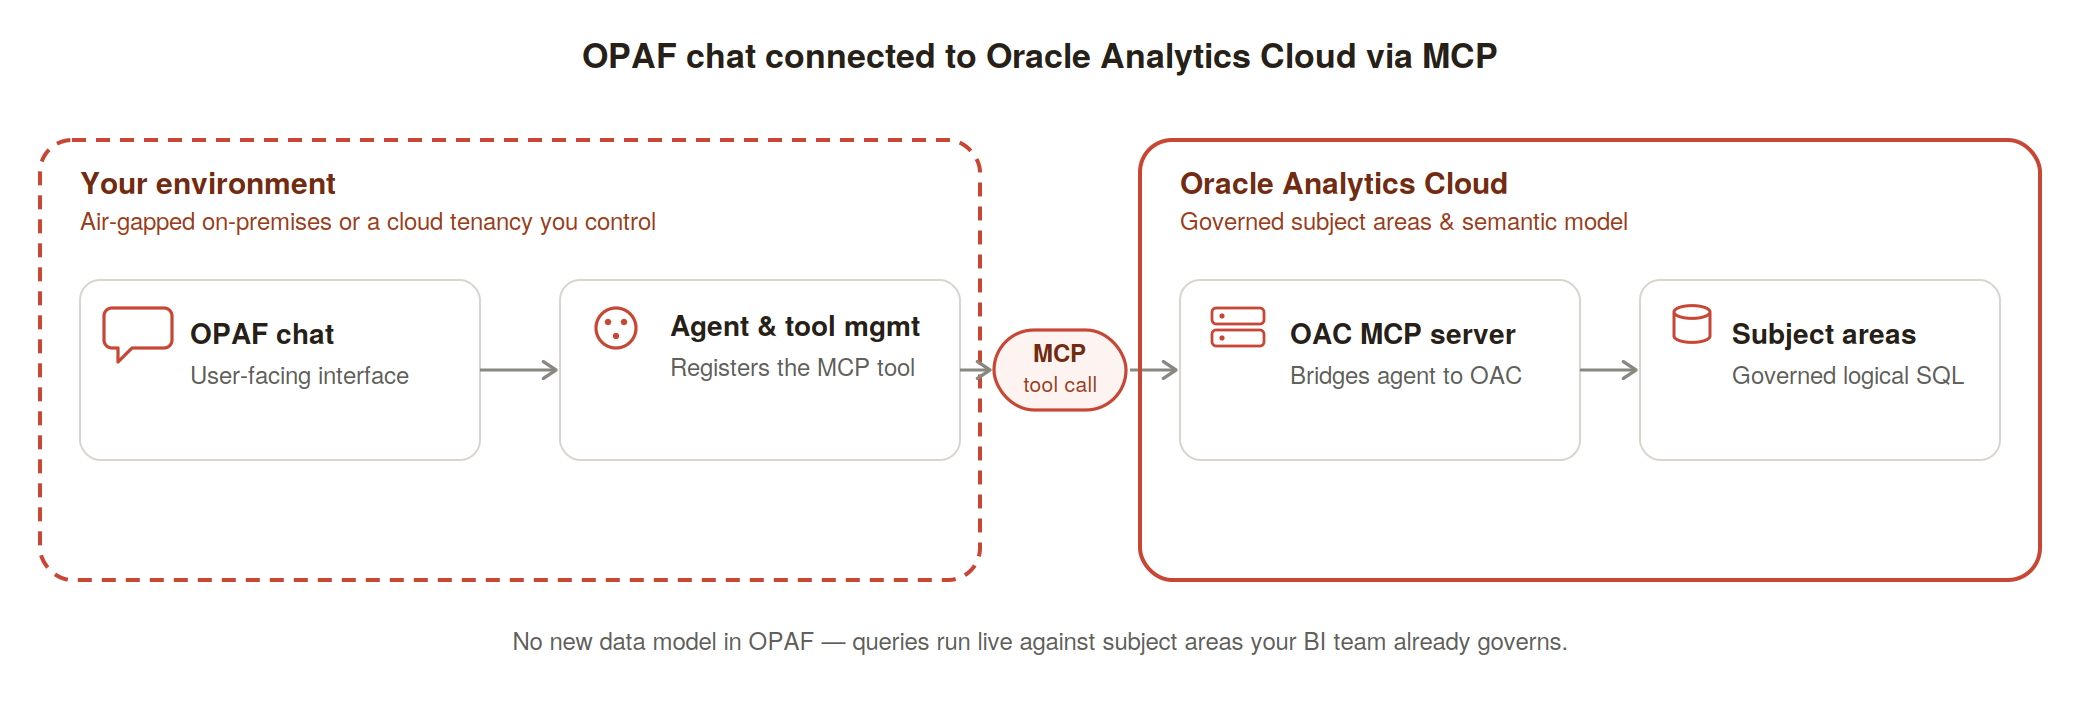
The integration sits on top of two separately governed boundaries, connected by a single MCP tool call.
Your environment (the dashed boundary) hosts OPAF itself: the chat interface and the agent's tool management. On-premises or a cloud tenancy you control, doesn't matter. Nothing about this integration changes where OPAF runs or how it's secured, though as noted above this specific OAC integration does need outbound connectivity from that environment to OAC (see Prerequisites).
Oracle Analytics Cloud (the solid boundary) stays exactly as your BI team built it. The OAC MCP Server sits at its edge and exposes controlled access to governed analytics content and semantic-model metadata, without OPAF needing to connect directly to the underlying physical data sources or reproduce the OAC model itself.
The MCP tool call in the middle is the only thing crossing that boundary. When OPAF's agent decides a question needs analytics data, it uses the MCP tools to discover the relevant OAC model, inspect its metadata, construct the appropriate Logical SQL and execute it against OAC. No data gets copied, no schema gets duplicated on the OPAF side.
At a high level, the flow looks like this:
OPAF Chat (user-facing) → OPAF Agent / Model Management → MCP tool call → OAC MCP Server → OAC Subject Area → Logical SQL execution
And importantly: none of this requires changes to existing infrastructure or workloads. The MCP connector is additive, not invasive, whether OPAF sits behind a corporate proxy on-premises or a load balancer in the cloud.
Prerequisites
Before you start, you'll want:
- A running OPAF deployment with Model/Tool Management available (this post assumes OPAF 26.7)
- An Oracle Analytics Cloud instance with subject areas already modeled and governed
- A network path from OPAF's host environment to your OAC instance. Direct, via proxy, or through whatever egress your environment requires
- Your OAC MCP Server's endpoint URL and the identity domain fronting it
One thing you won't need: the downloadable oac-mcp-connect utility or its local client configuration from your OAC profile. That's a local stdio bridge meant for desktop clients like Claude Desktop or Codex, which don't directly manage MCP HTTP sessions on their own. OPAF connects straight to the OAC MCP HTTP endpoint, server-to-server, so you can skip that download entirely.
Setting it up: Create the integrated application
In your OCI IAM Identity Domain console, go to Applications → Integrated applications → Add application, and choose Confidential Application as the type. This is what lets the application securely hold a client secret, unlike a public or native client.
Give it a descriptive name — opaf-oac-mcp-client works fine. It's just a label used in the console and audit logs, so it doesn't need to match any hostname or endpoint.
Once created, the application sits in a Configuration required or Inactive state until you finish the OAuth configuration below.
Setting it up: Configure the OAuth client
Open the new application and go to OAuth configuration → Client configuration, then pick Configure this application as a client now.
Under Allowed grant types, you'll want to enable Authorization code, since that's required for the interactive OAuth flow OPAF uses, and Refresh token, so OPAF doesn't need to re-prompt for consent on every call. Client credentials is optional; only turn it on if you also want a separate machine-to-machine path independent of the interactive flow.
For Redirect URL, add the callback URL OPAF generated when you selected OAuth + Authorization code in the "Add MCP server" form (more on that below). Register the exact URL OPAF shows you. Protocol, hostname, port and path all need to match precisely. Pre-registering a few speculative variants doesn't actually help; it just broadens the OAuth configuration unnecessarily.
Set Client type to Confidential, not Trusted, since you're not using self-signed client assertions.
Setting it up: Scope the client to your OAC instance
Still in OAuth configuration, expand Client configuration → Token issuance policy.
Toggle Add resources on. Under Authorized resources, choose Specific rather than All — this restricts the client to only the Oracle Analytics Cloud instance you explicitly grant it, instead of every resource registered in the domain.
Under Resources, search for and select your OAC instance, then add its scope. This is the step that actually ties the OAuth client to your OAC environment; everything up to now has been generic OAuth plumbing.
If you'd rather the person performing the MCP source authorization not see an OAuth consent screen, you can enable Bypass consent here. For a controlled internal deployment that's often reasonable. One thing worth being clear on though: this applies to the one-time authorization of the MCP source itself. It does not mean every OPAF chat user individually authorizes OAC — that stored, single authorization is exactly what the Known Limitation section further down covers.
Setting it up: Collect the client credentials
Once submitted, copy the Client ID from the application's Details tab, and generate/copy the Client secret. Both go directly into the OAuth client ID and OAuth client secret fields on OPAF's "Add MCP server" form.
Treat the client secret like any other credential. Don't commit it to source control, don't paste it into shared docs, and rotate it if it's ever exposed.
Add the MCP server in OPAF
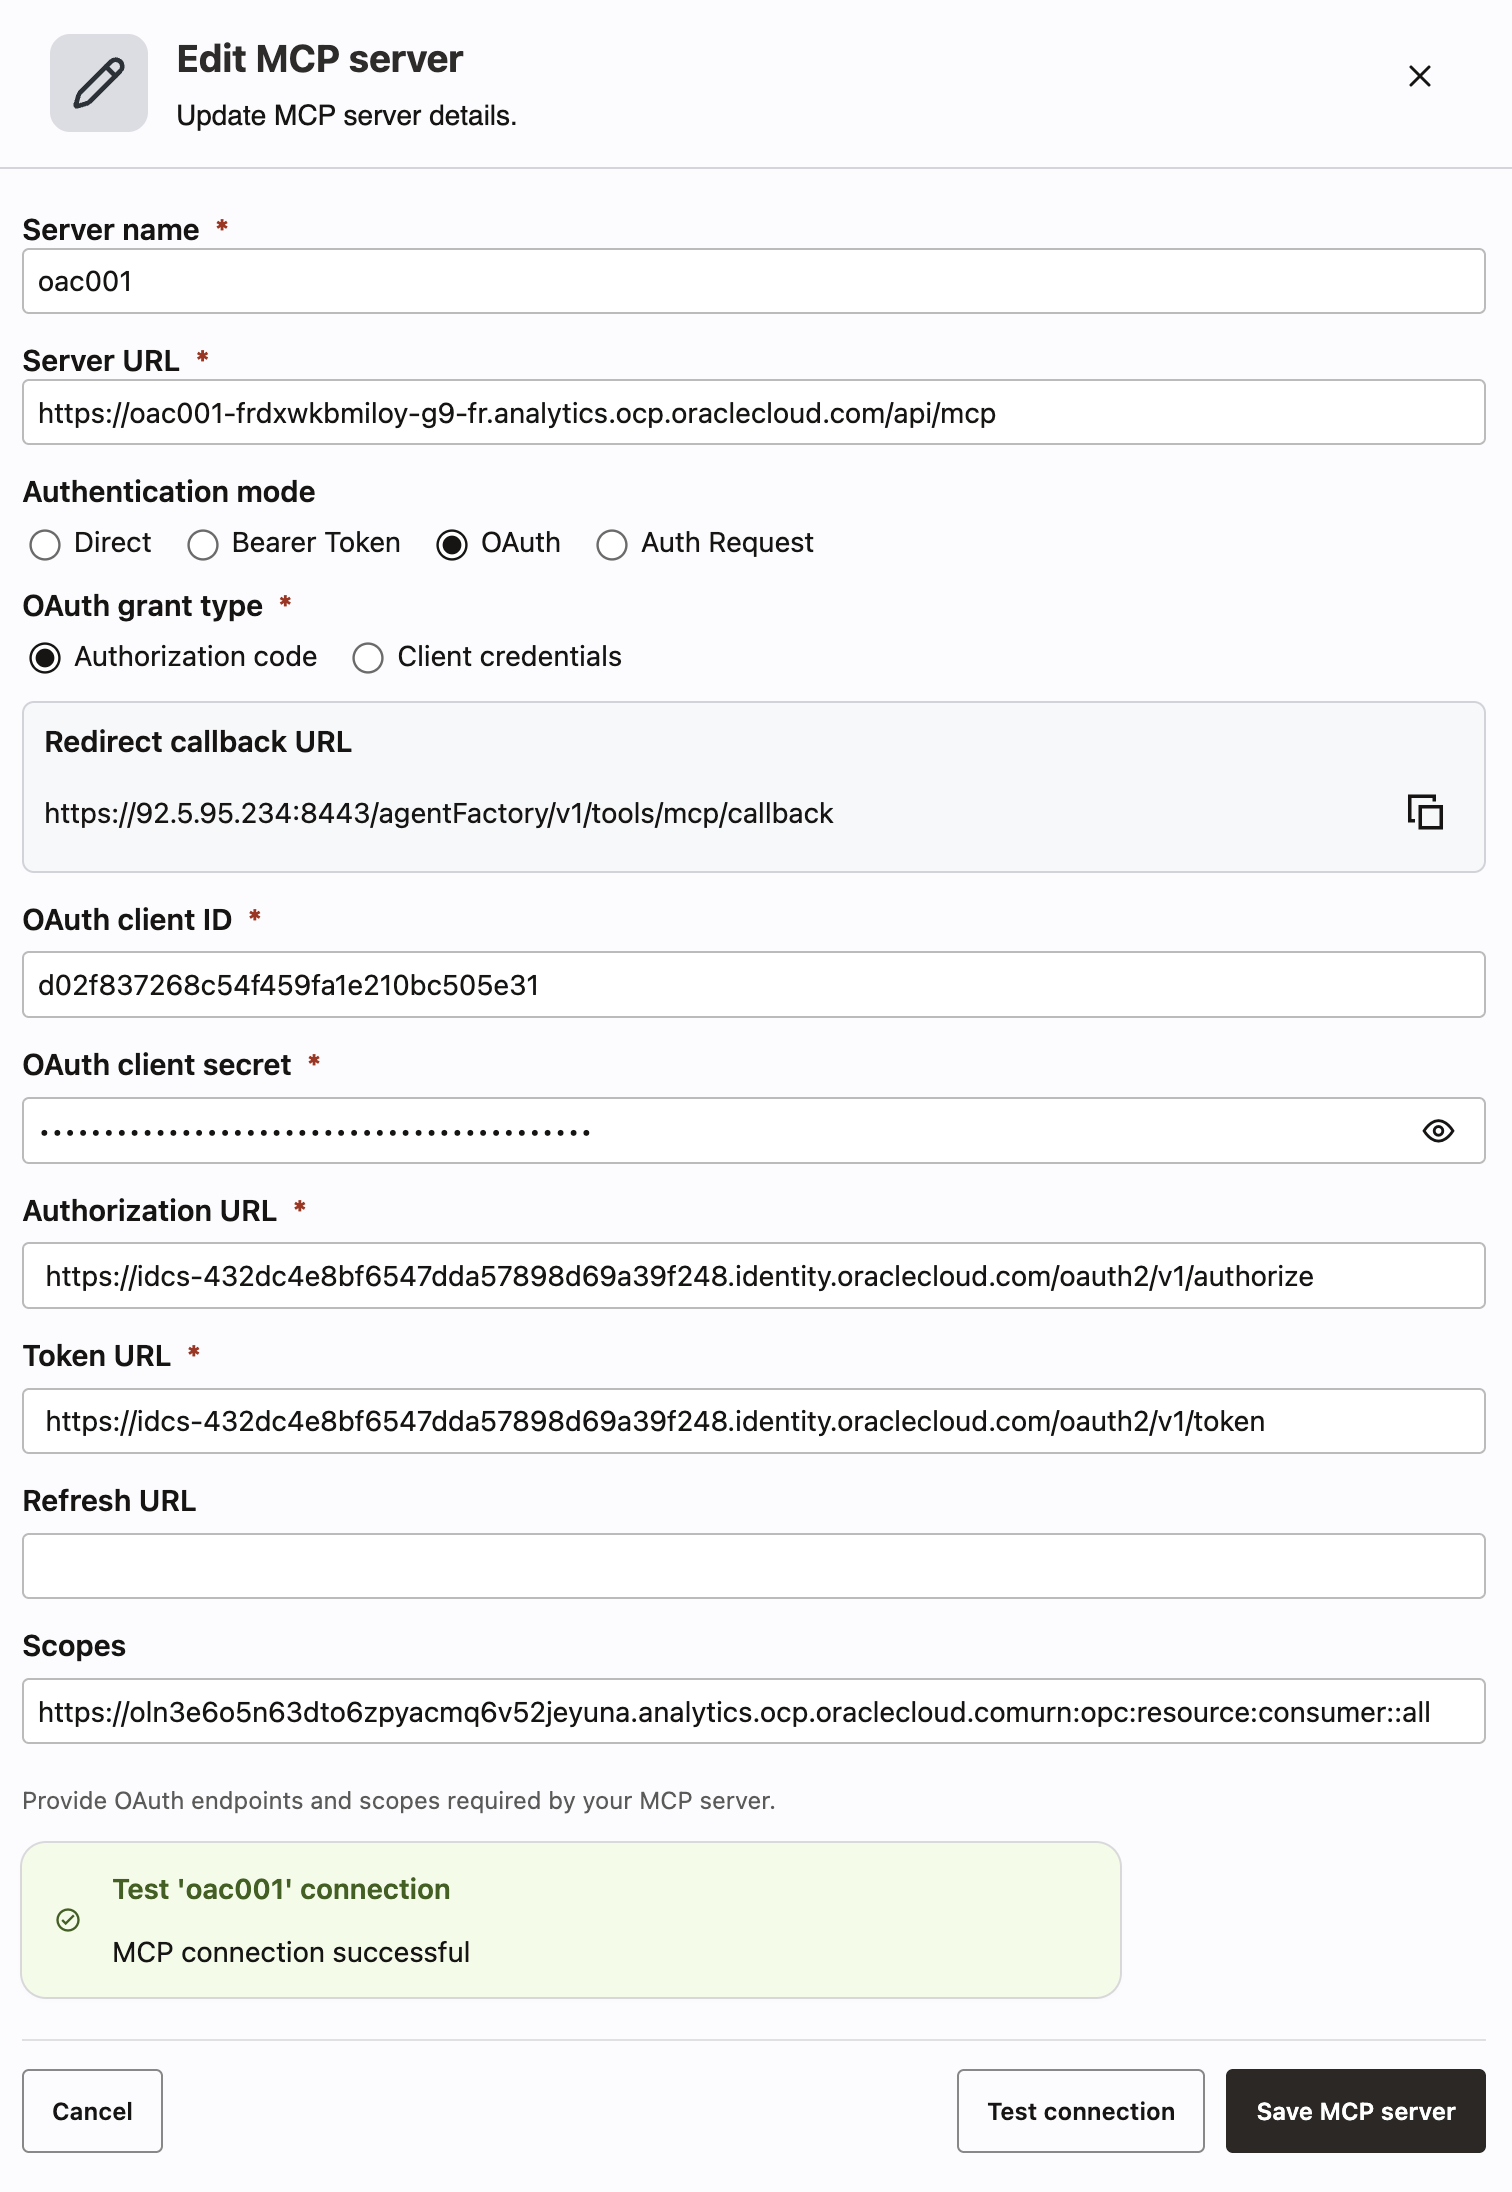
Back in OPAF, open Model/Tool Management → Add MCP server. This form does double duty: you'll touch it once early on to generate the redirect callback URL for the identity domain setup above, and once more at the end to actually finish the connection.
Server details:
- Server name — a short identifier, e.g.
oac-mcp-connect - Server URL — the endpoint of your OAC MCP Server
Authentication mode: select OAuth, then under OAuth grant type pick Authorization code. This is what triggers OPAF to display the Redirect callback URL box — grab that value now if you haven't already added it to the integrated application's redirect URLs in the identity domain step above.
OAuth client details:
- OAuth client ID and OAuth client secret, pasted from the integrated application's Details tab
- Authorization URL and Token URL — your identity domain's
/oauth2/v1/authorizeand/oauth2/v1/tokenendpoints - Refresh URL is optional; leave it blank unless your identity domain exposes a separate refresh endpoint
- Scopes — the OAC resource scope you added when scoping the client to your OAC instance
Test and save. Click Test connection before Add MCP server. This actually runs the OAuth handshake, redirect through your identity domain and all, rather than just checking the form fields are filled in. If it fails, the usual culprit is a redirect URL that doesn't exactly match what's registered on the integrated application.
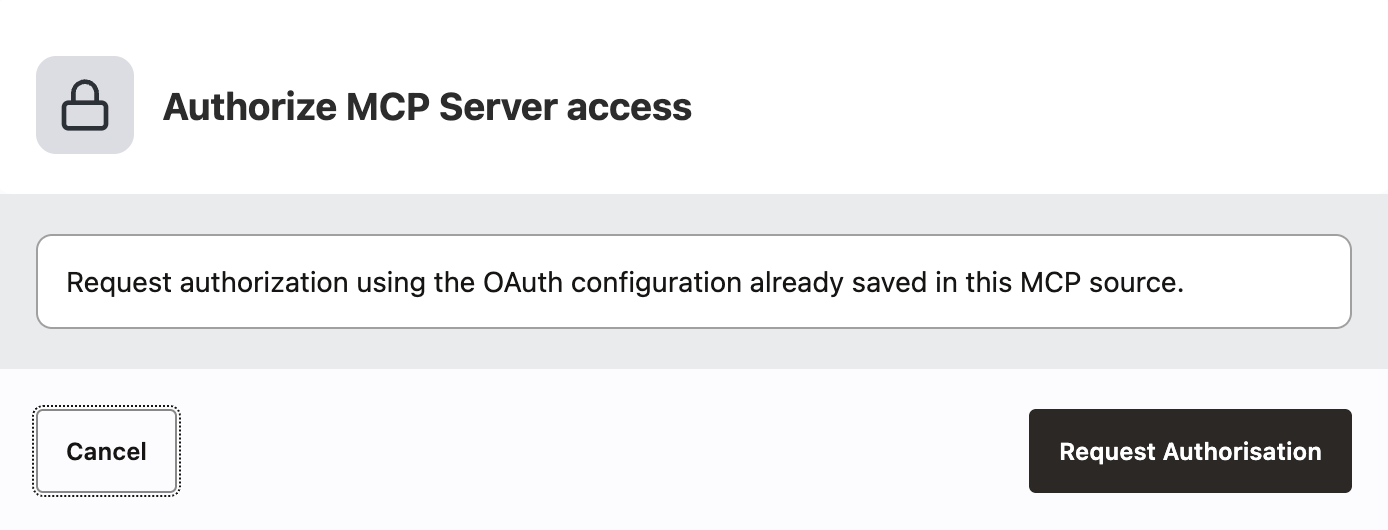
Complete the authorization. Saving the MCP server doesn't finish the OAuth handshake by itself. OPAF prompts for one more step: Authorize MCP Server access, which is the "Request authorization using the OAuth configuration already saved in this MCP source" screen. This is where the identity discussed in the Gotchas and Known Limitation sections gets locked in — whoever clicks Request Authorisation here becomes the identity every future chat session uses to call OAC.
Clicking through opens your identity domain's login/consent page in a new window. Authorize, and you'll see a simple confirmation you can close:
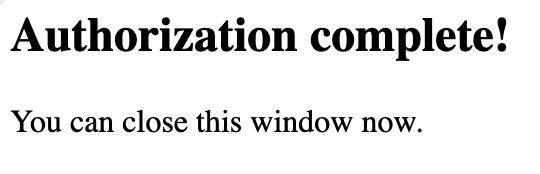
At that point the MCP server is fully connected and ready to use in Agent Builder.
Wire it up in Agent Builder
With the MCP server registered, Agent Builder is where it actually becomes part of a working agent. The canvas here is a simple five-node flow: MCP server → Agent → Type Convert → Chat output, fed by a Chat input node.
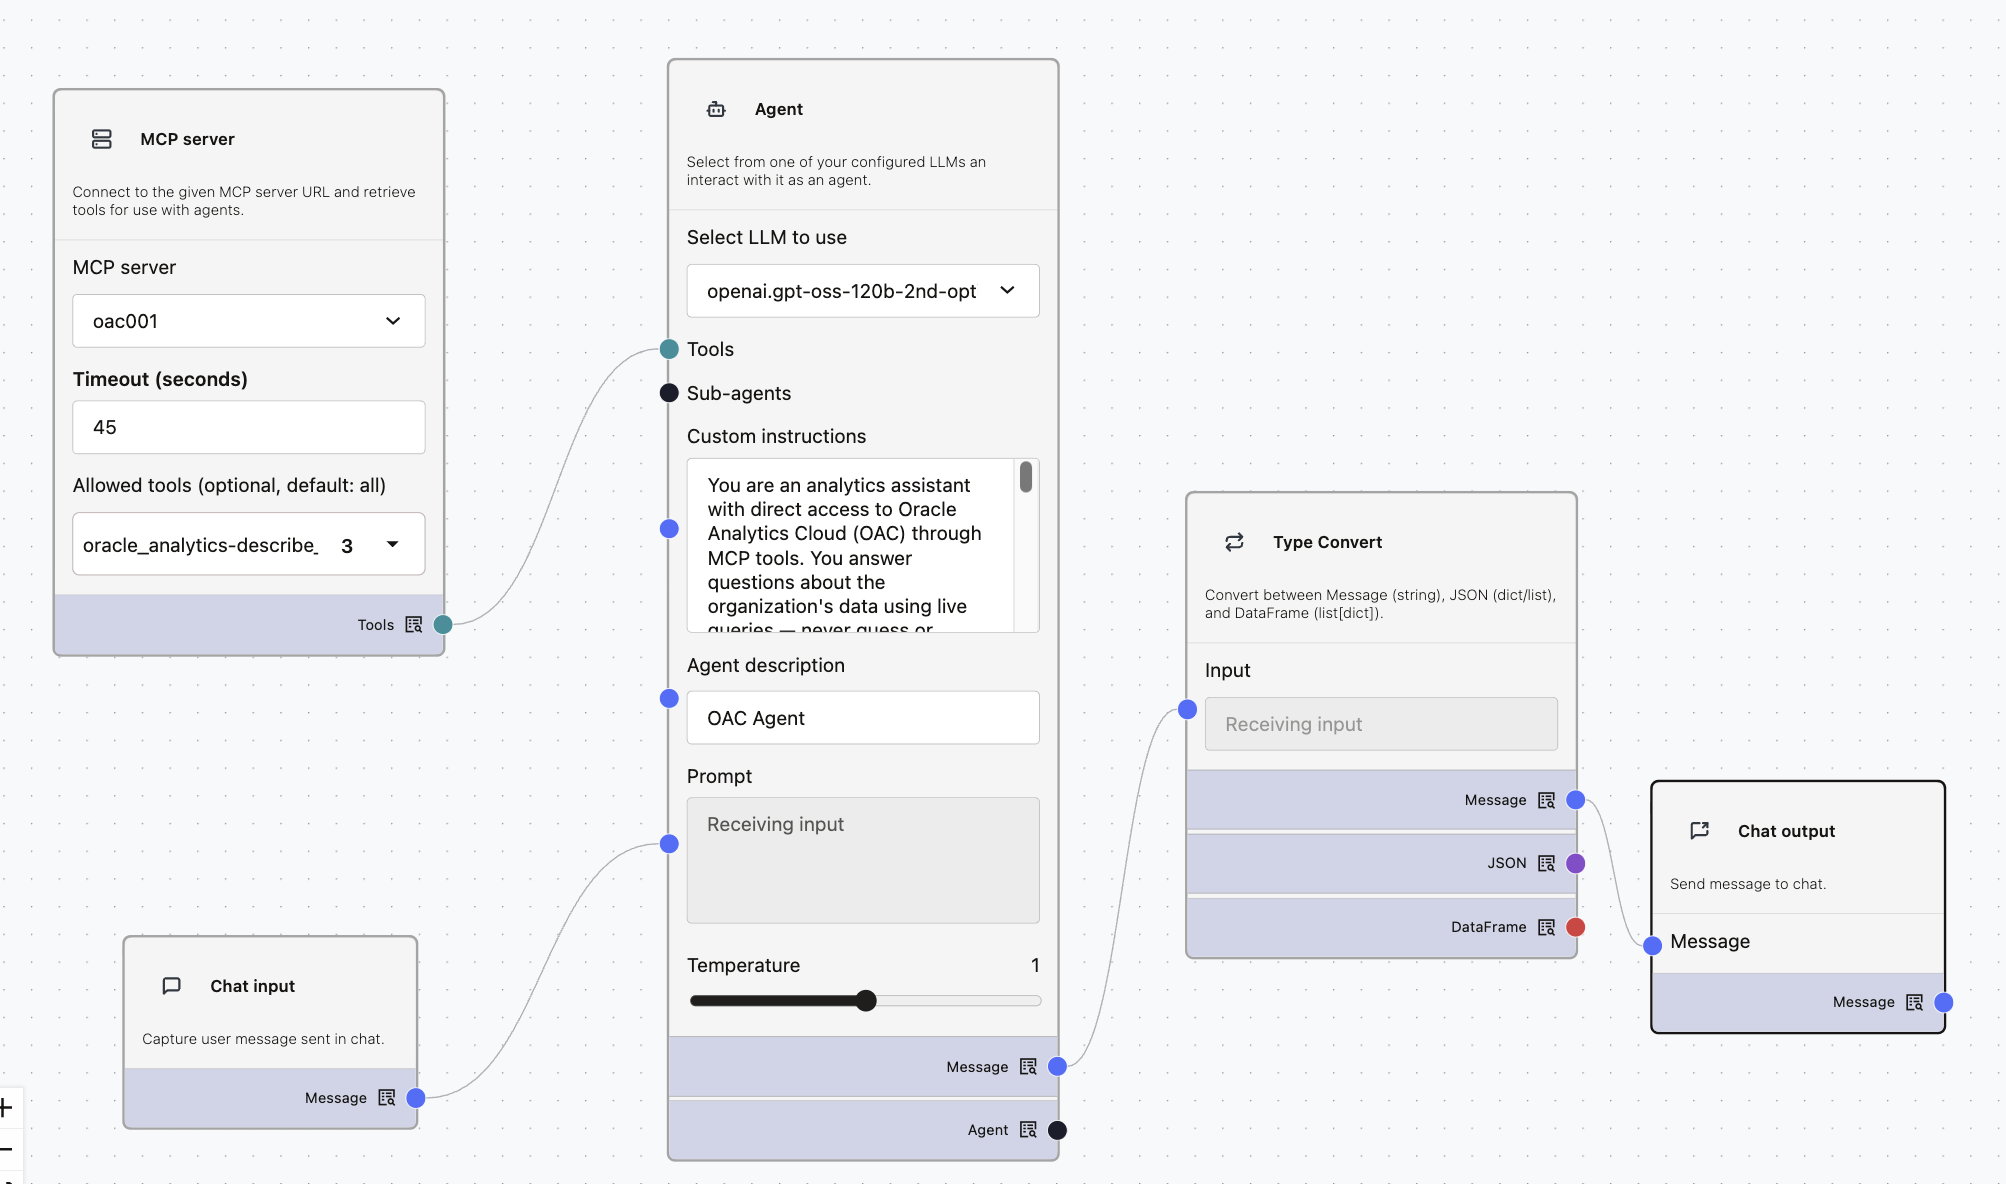
MCP server node. Select the OAC MCP server you registered in the previous step. Timeout defaults to 45 seconds; only increase it if the target MCP tool is expected to run longer, like an especially heavy Logical SQL query. Allowed tools defaults to everything the MCP server exposes, but it's worth narrowing this down to just what the agent actually needs — search, describe and execute, say — rather than leaving every available tool on the table. Its Tools output feeds into the Agent node's Tools input.
Agent node. Pick whatever LLM you have configured in OPAF; there's nothing OAC-specific about the model choice here. Tools comes in from the MCP server connection above. Custom instructions is where you tell the model what it's actually for — something along the lines of: "You are an analytics assistant with direct access to Oracle Analytics Cloud through MCP tools. Answer questions about the organization's data using live queries — never guess or fabricate numbers." Being explicit that answers must come from real tool calls rather than the model's own assumptions matters more here than in a typical general-purpose chat agent. Give it an agent description (a short label), and connect Prompt to the Chat input node's Message output so it actually receives the user's question. I kept Temperature low-to-moderate, since consistent, grounded answers matter more than creative variation for something like this. The Message output — the agent's response text — feeds into the next node.
Type Convert node. The agent's raw output needs to be coerced into the right shape before it can go back to the user. This node converts between Message (string), JSON and DataFrame; here only the Message branch gets used, feeding straight into chat output.
Chat output node. Takes the converted Message and sends it back to the user in OPAF's chat interface, closing the loop from question to a grounded, OAC-backed answer.
Test it!
The OAC MCP Server actually exposes a lot more tools than any single agent typically needs — content summarization, dashboard and report discovery beyond raw catalog search, various other OAC-specific helpers. For an analytics-answering agent, three tools cover the catalog-driven discover-describe-query cycle just fine. There's also find_matching_datasources, which is worth knowing about for natural-language datasource discovery:
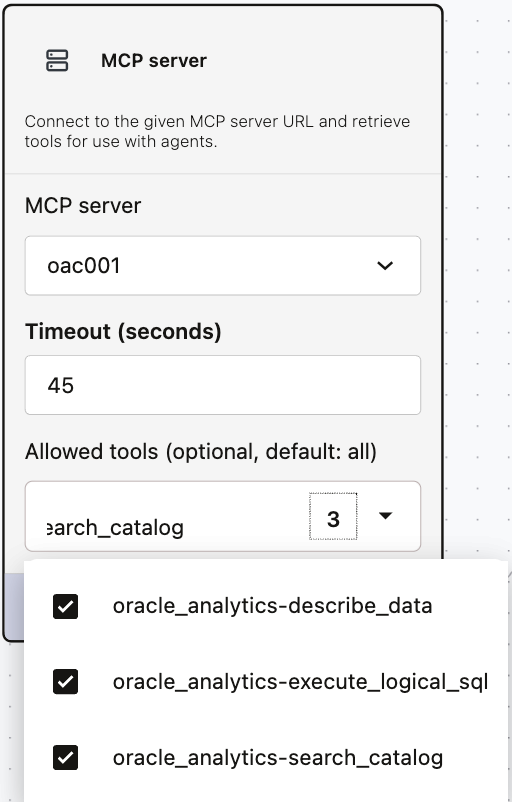
oracle_analytics-search_catalog searches the OAC catalog to find available datasets, subject areas and other analytics content the agent can query.
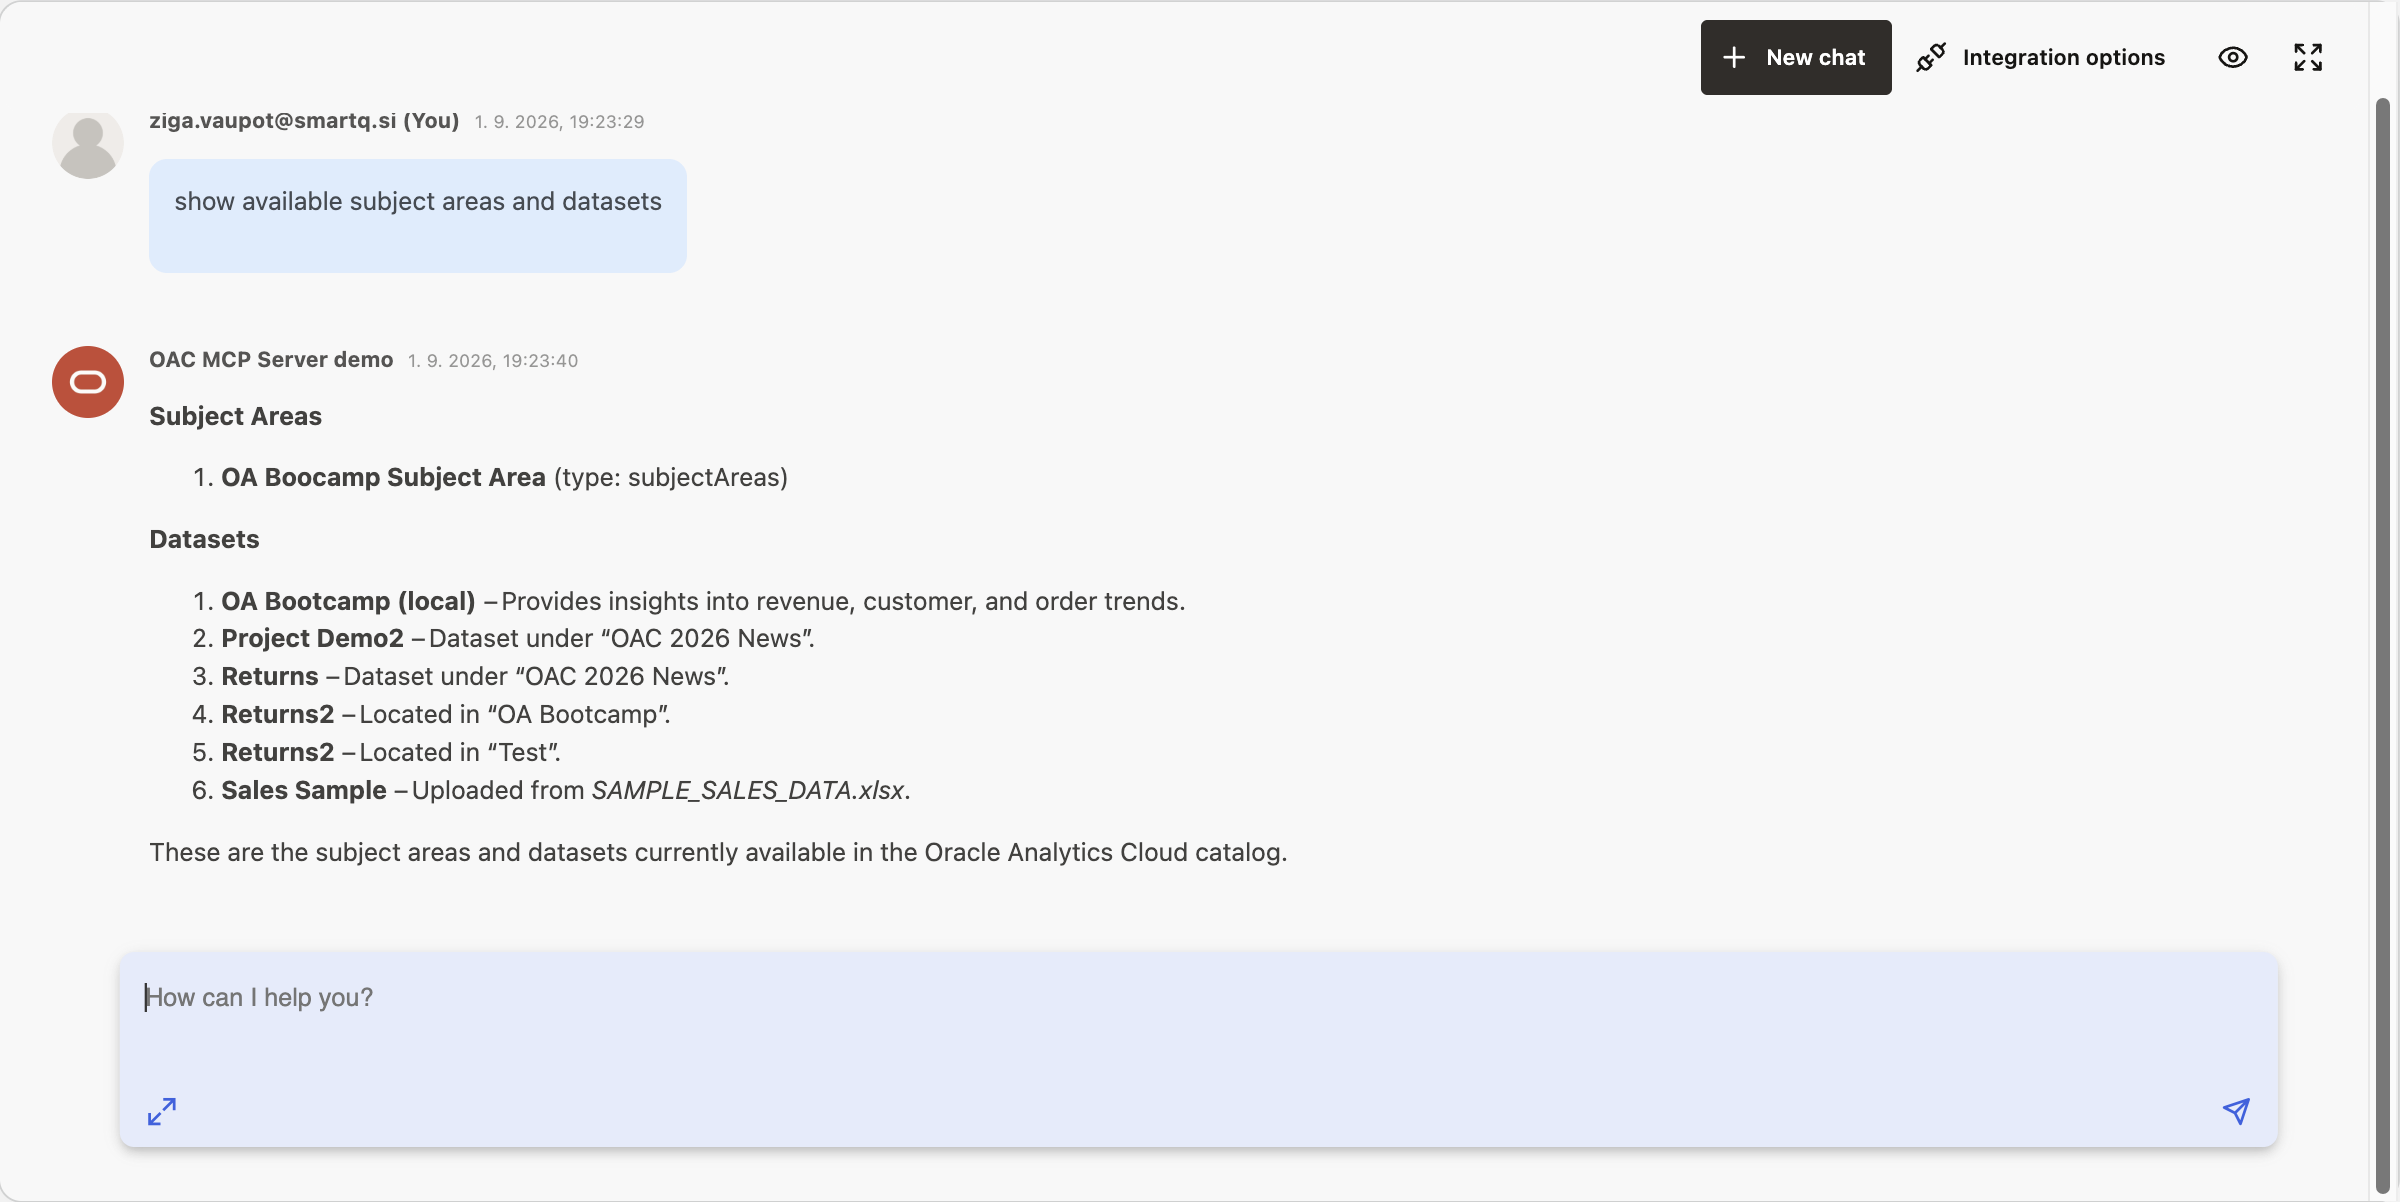
oracle_analytics-describe_data pulls column-level metadata for a given dataset or subject area: dimensions, measures, hierarchies, joins.
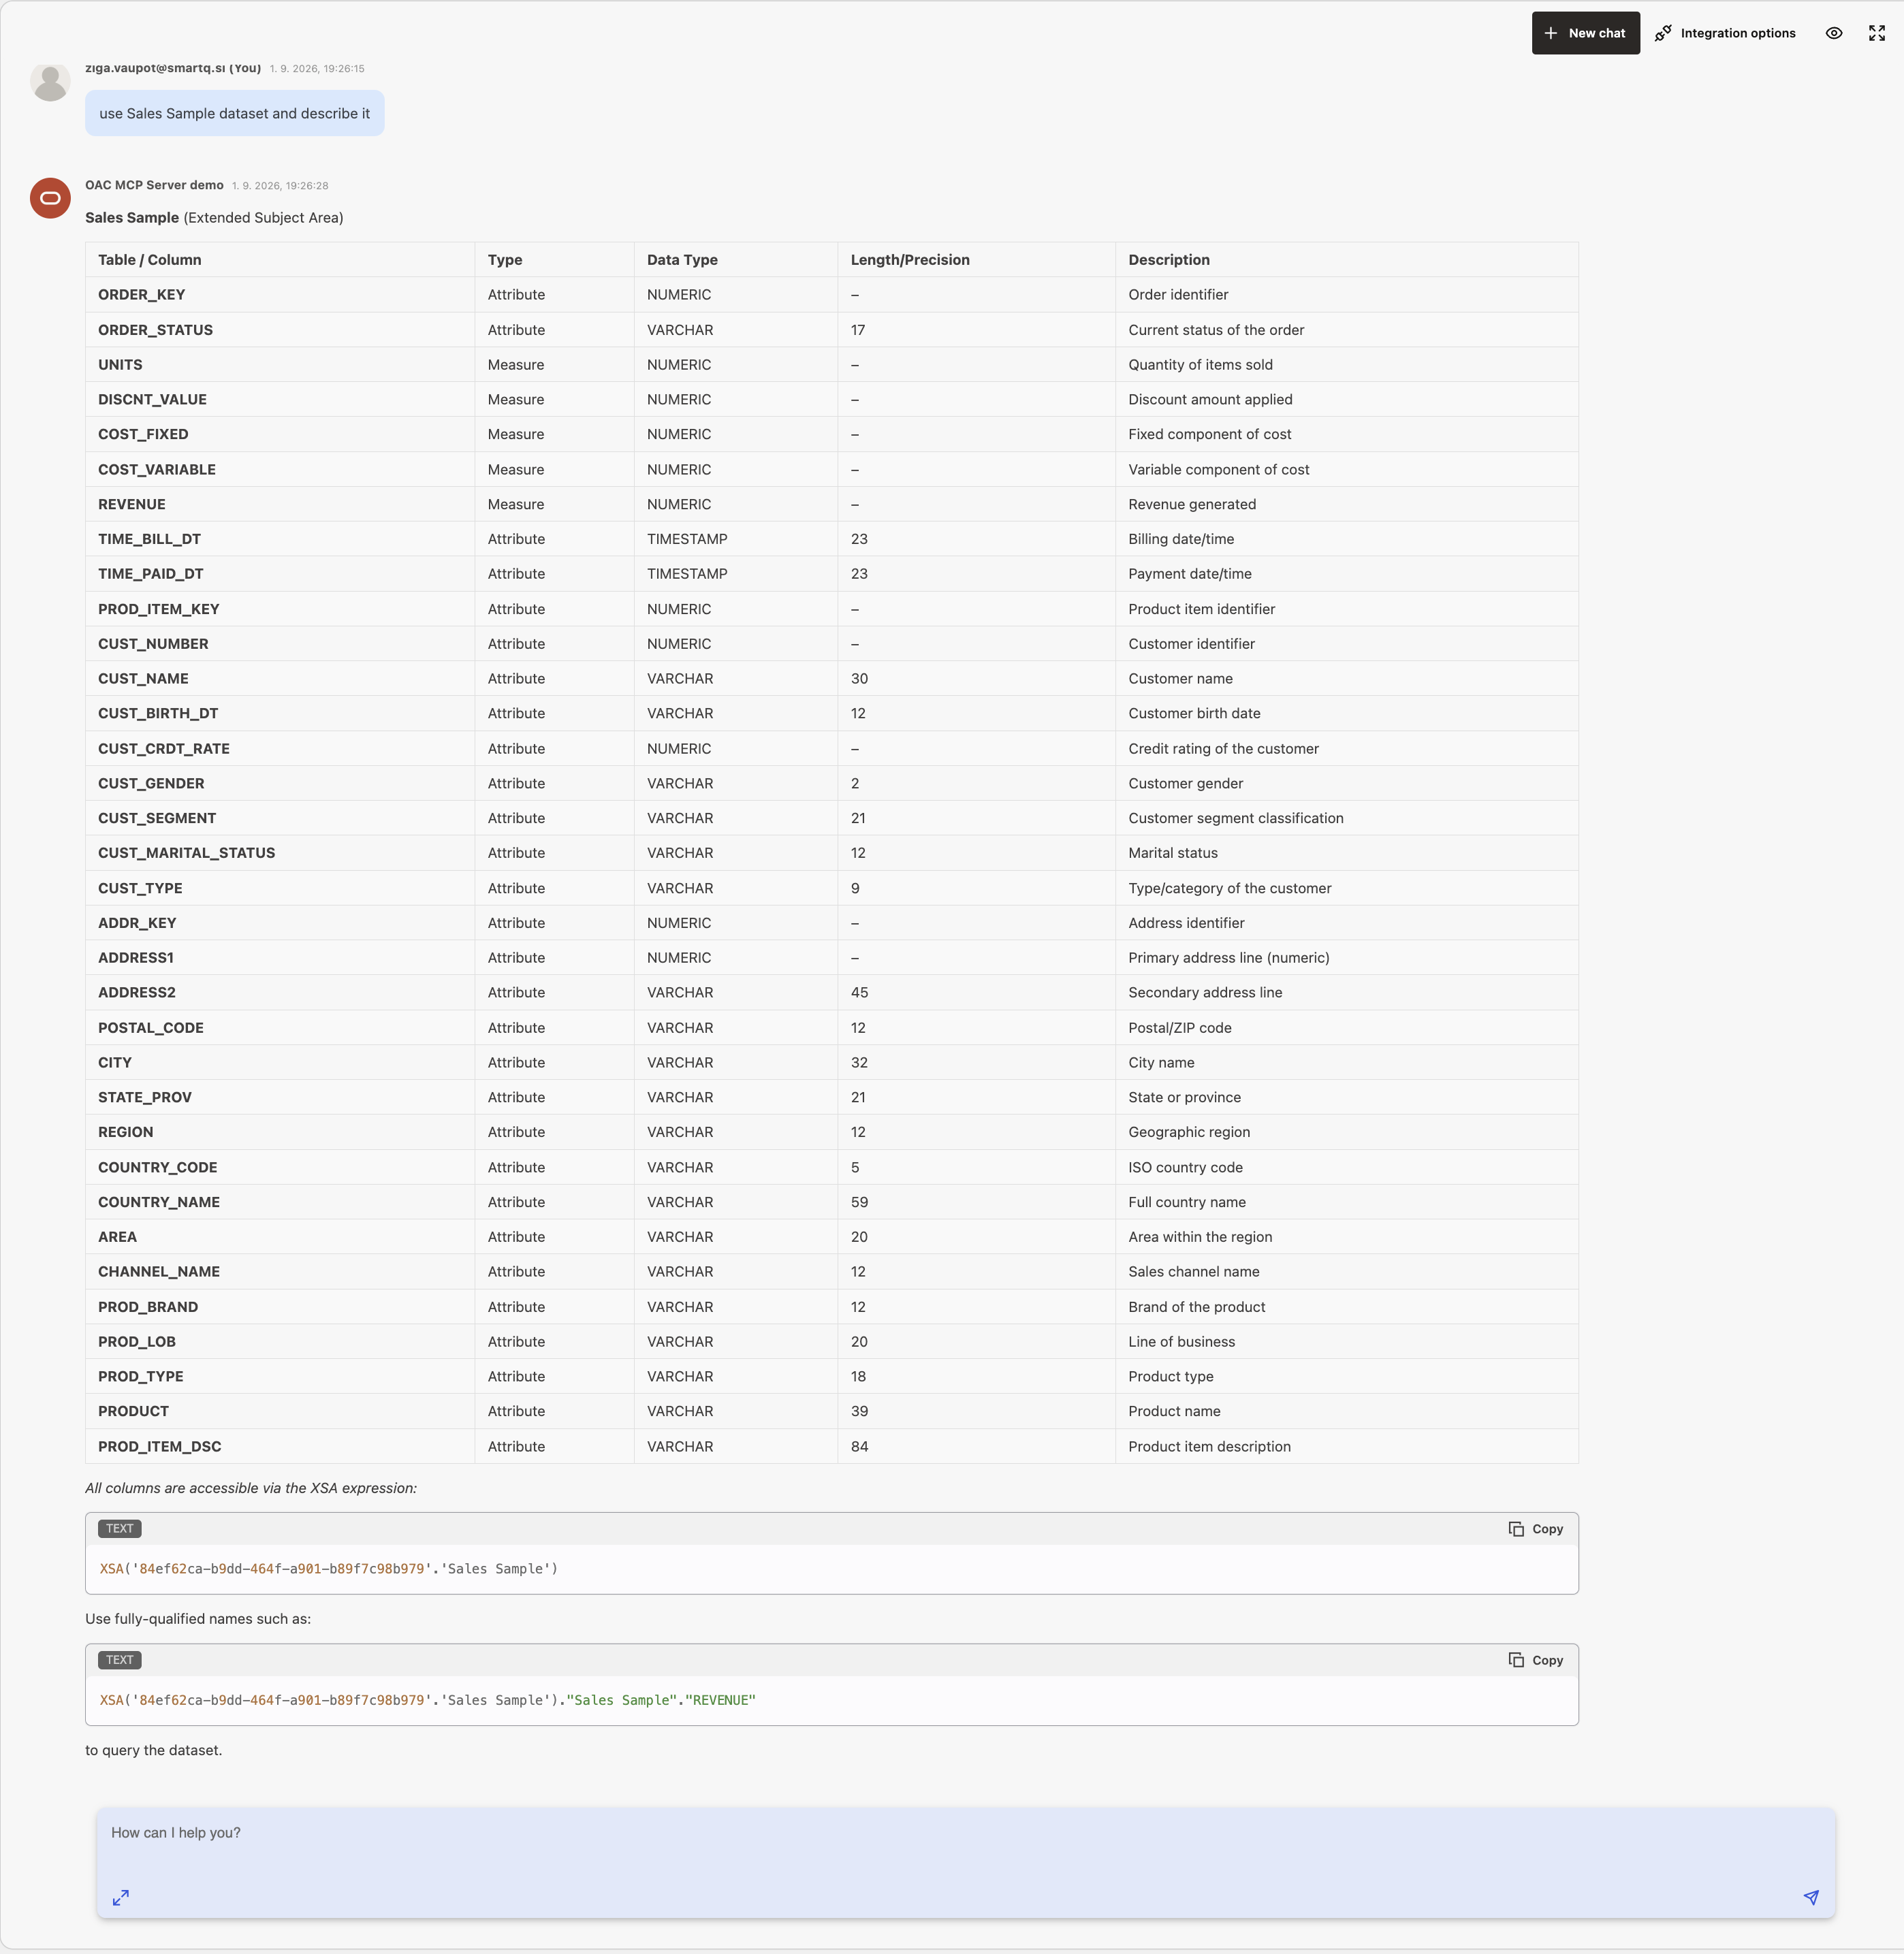
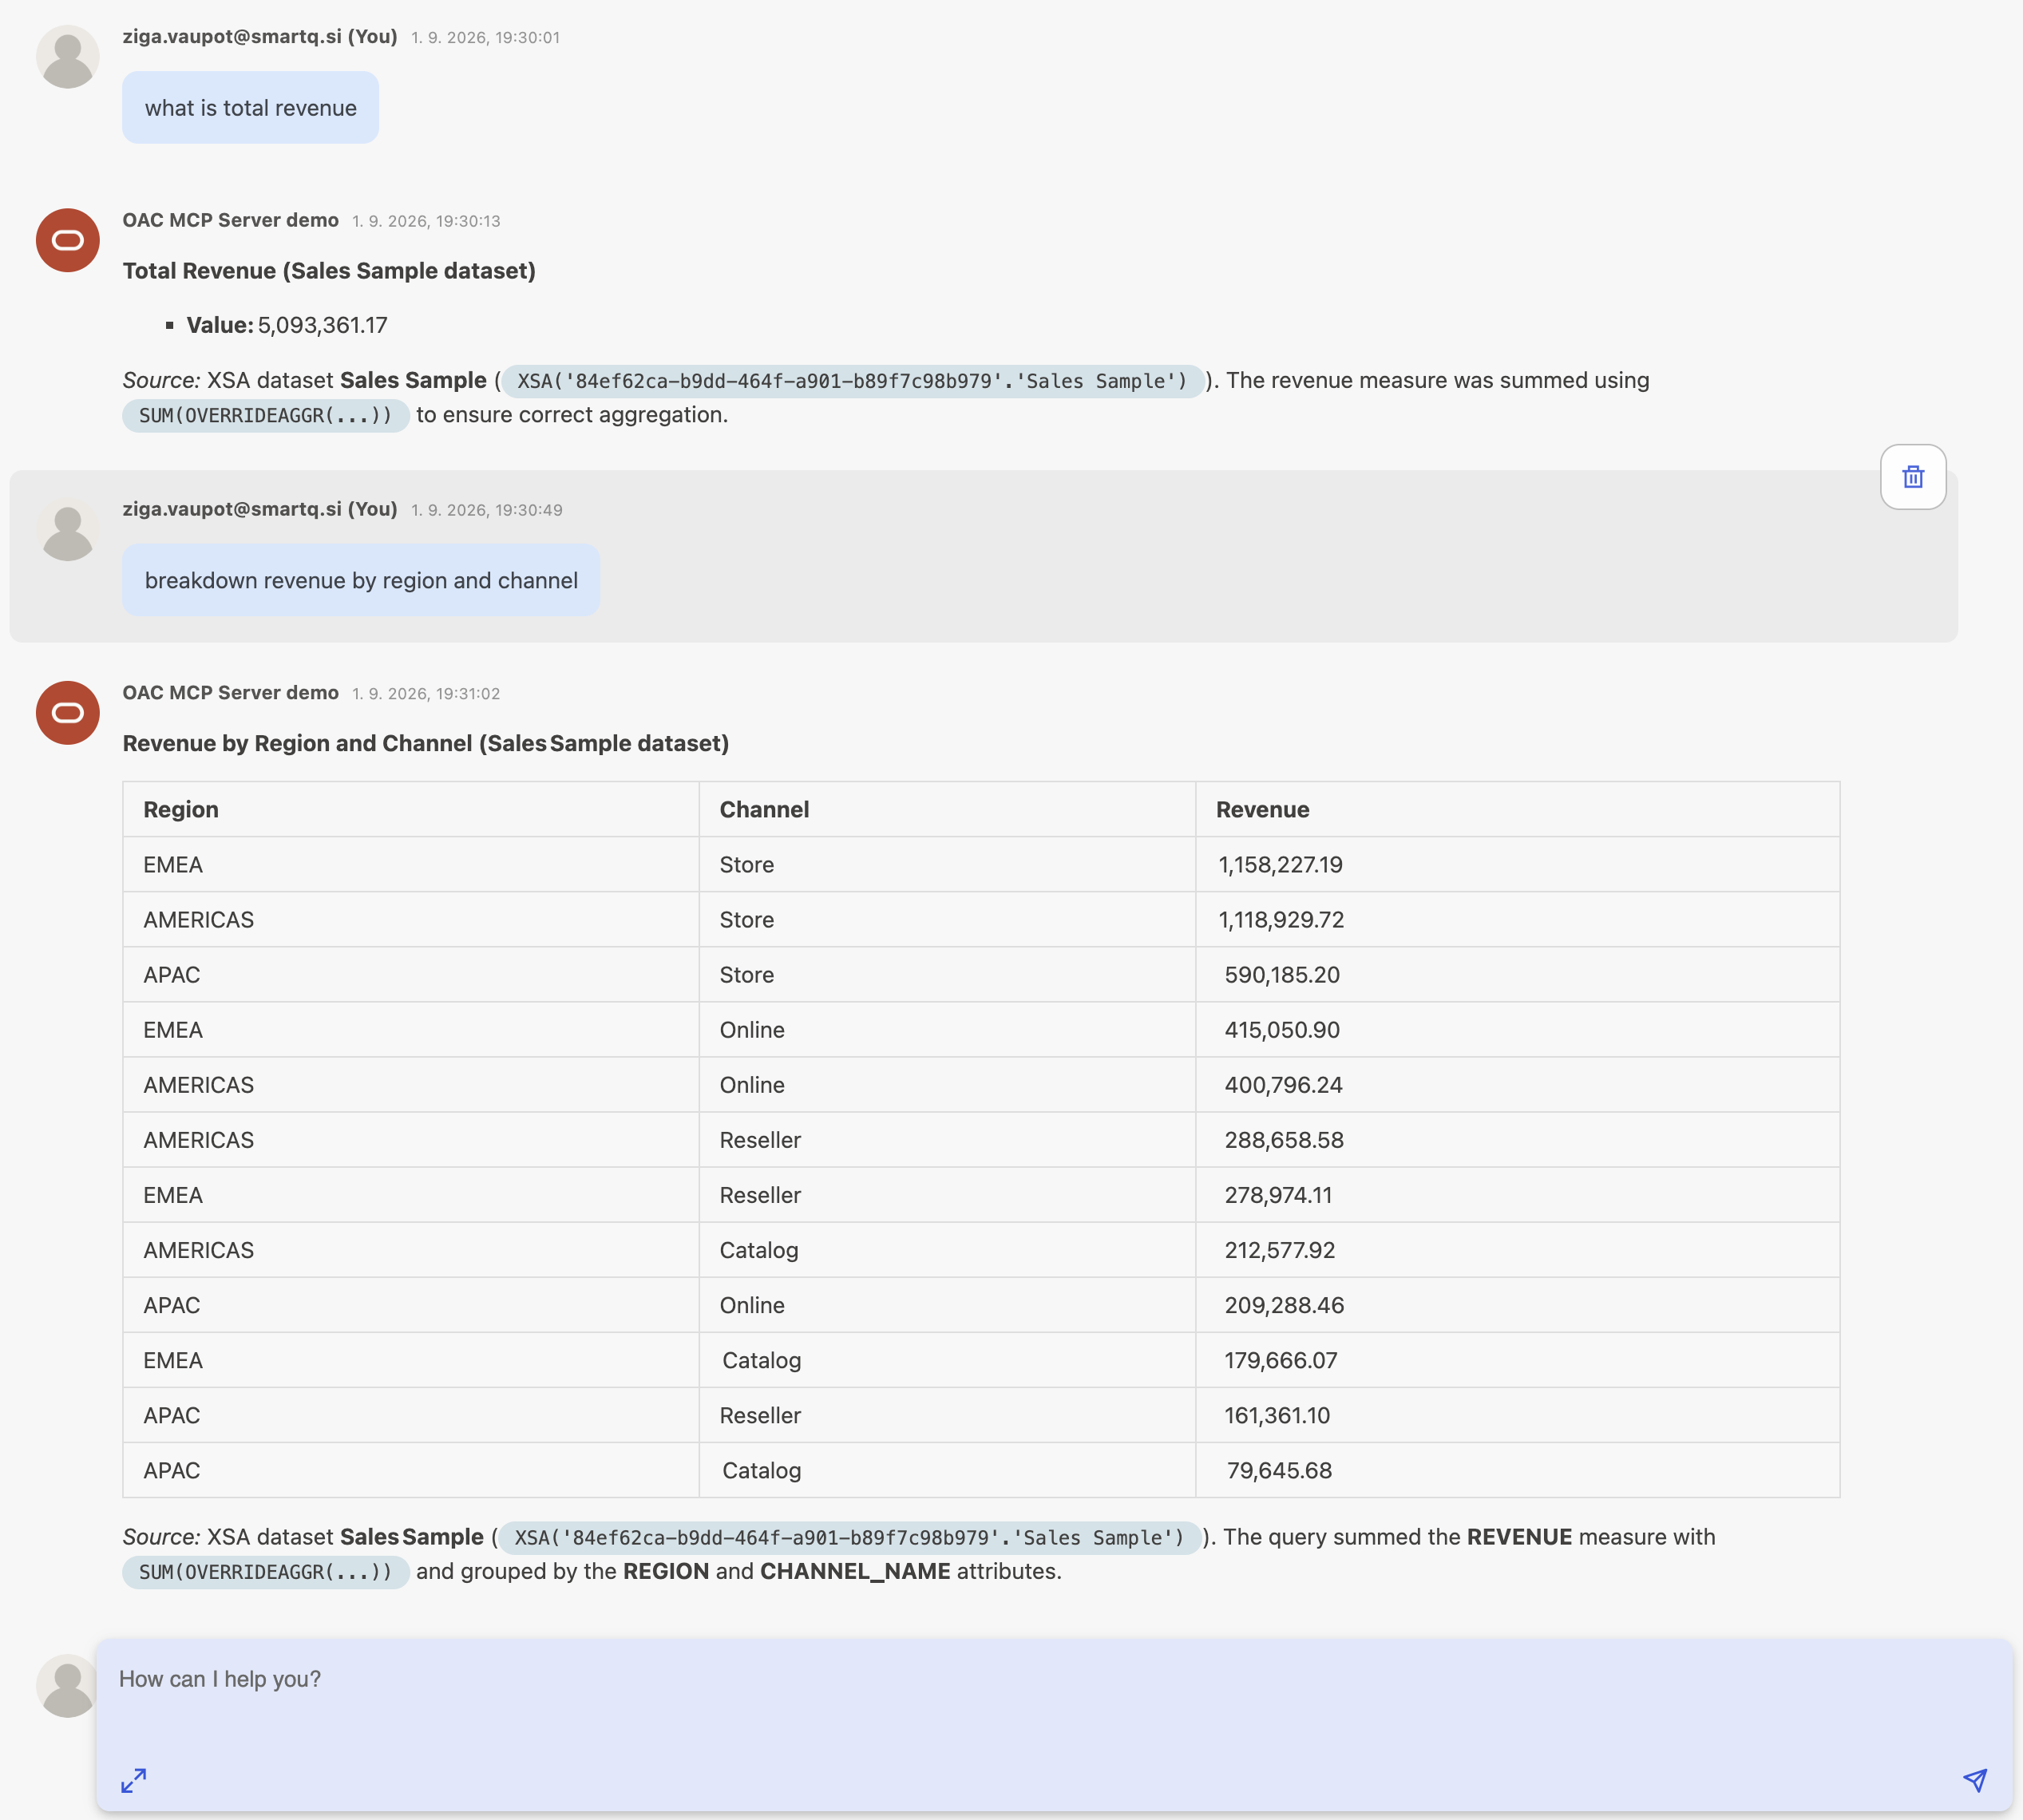
oracle_analytics-execute_logical_sql runs a governed SQL query against OAC and returns the result set.
Closing Thoughts
None of this needed touching OAC's data model, duplicating a subject area, or building a custom connector from scratch. The heavy lifting — discovering metadata, generating Logical SQL, executing it against governed data — is handled entirely by the OAC MCP Server. What OPAF brings is everything specific to running that inside your own environment: its own identity domain fronting the OAuth handshake, its own Agent Builder canvas for wiring the MCP tools into a working assistant, its own chat interface for the people actually asking questions.
Honestly, the parts most likely to trip you up aren't conceptual. It's the fiddly OAuth mechanics: getting the redirect URL to match exactly between OPAF's generated callback and the identity domain's registered client, and scoping the OAuth client to the right OAC resource instead of leaving it open to the whole domain. Get that handshake working once, and the rest — registering tools, wiring up Agent Builder, asking questions in chat — is comparatively straightforward, as the walkthrough above hopefully shows.
At the very end, some gotchas & heads-up notes
A few things worth knowing before you start:
- Redirect URL is a chicken-and-egg problem. OPAF only shows the callback URL after you select OAuth in "Add MCP server," but the identity domain needs that exact URL registered first. Protocol, hostname, port, and path all have to match — register what OPAF actually shows you, not guesses.
- The OAC identity isn't the person chatting. OAC MCP tools run as whoever authorized the MCP source, not whoever's logged into OPAF at query time. Matters if your OAC security relies on row-level or per-user permissions — see Known Limitation below.
- Scope the OAuth client to Specific, not All. Otherwise it can request access to any resource in the identity domain.
- Narrow Allowed tools. The OAC MCP Server exposes far more than search/describe/execute — catalog management, exports, some write-capable operations. Restrict a read-only agent to the discovery-and-query subset. This adds a capability boundary at the agent layer; OAC's own permissions remain the real authorization boundary underneath.
- Tell the agent not to guess. Discover, describe, then execute — and if it can't retrieve the data, it should say so rather than fabricate a plausible number.
- Network connectivity is from OPAF, not your laptop. MCP requests originate from the Agent Factory container, so the OAC endpoint needs to be reachable from there — matters most with private subnets, egress rules, or proxies.
- 45-second default timeout, per OPAF's docs. How it behaves with a large streamed Logical SQL result set is less documented — worth testing directly if that matters to you.
- Expect version drift. The OAC MCP Server is Preview; both sides are moving fast.
Known Limitation: One Shared OAC Identity, Not Per-User
Worth being upfront about a limitation here rather than glossing over it. Even though OPAF and OAC can sit behind the same SSO identity domain, that doesn't mean OAC actually sees who's chatting in OPAF.
OPAF SSO and MCP source authorization are two separate events. SSO authenticates a person into the OPAF chat interface. MCP authorization is a one-time step performed when the MCP source is configured — whoever completes it causes OPAF to obtain and store an OAC access token representing that user's authorization, against the MCP source itself, not against individual chat sessions. Every subsequent query, from every OPAF user, runs against OAC as that one authorized identity.
For a proof-of-concept, or an internal tool where everyone using the agent is meant to see the same governed subject areas anyway, that's a reasonable trade-off. It's simple and it works. But if your OAC security model relies on row-level security or per-user catalog permissions, this integration is really giving you one shared analytical identity, not each user's own OAC access.
Closing that gap properly would need a delegation or token-exchange layer: OPAF would have to hand the authenticated chat user's identity to something capable of exchanging it for an OAC-scoped access token on each call, so OAC could enforce that specific user's roles and row-level security instead of the stored source identity's. This is a well-understood "on-behalf-of" pattern in enterprise identity architecture generally, but as of OPAF 26.7, OPAF doesn't document exposing the authenticated user's identity to an MCP tool invocation. So there's currently no hook for a proxy or intermediary to build that exchange on top of.
I went and checked whether any of OPAF's other authentication modes get around this. None do — they all reduce to the same basic shape, one configured identity shared by every chat user:
Direct/no auth has no credential at all beyond network trust, so access is the same for everyone. Bearer token is a single static token, configured once. Client credentials authenticates the application itself through OAuth, with no human user involved at any point, not even at setup. And Auth Request, despite the name, isn't per-request user authorization either — it's a service-account credential pair (token endpoint URL, username, password) that Agent Factory exchanges for a bearer token behind the scenes. Same static-identity pattern, just a different exchange mechanism than OAuth.
So none of OPAF's currently documented MCP authentication modes give you automatic per-chat-user identity propagation. Depending on the mode, the MCP source either has no application-layer identity at all (Direct/no auth), uses one configured credential or token (Bearer token, Client credentials, Auth Request), or uses one OAuth authorization stored against the source (Authorization code, which is what this post uses throughout). Either way, none of them carry the individual OPAF chat user's identity through to the downstream MCP server.
This feels like a natural direction for OPAF's MCP support to grow into eventually, given how much of the groundwork — a shared identity domain, SSO on both sides — is already there. Until then, be deliberate about who performs the MCP source authorization, since that person's OAC permissions effectively become the permissions the whole integration runs with.
References
Oracle documentation I used while writing and fact-checking this post:
OPAF / Agent Factory
- Add MCP Server — authentication modes, MCP configuration model, OAuth setup
- Third-Party MCP Servers — integration checklist and example public MCP servers
Oracle Analytics Cloud MCP Server (Preview)
- Overview of Developing with Oracle Analytics Cloud MCP Server
- About the Tools Available With Oracle Analytics Cloud MCP Server
- Available Oracle Analytics Cloud MCP Tools — full tool list, including the catalog-management tools this post doesn't cover
- Visible MCP Tool Metadata
- Use the oracle_analytics-execute_logical_sql MCP Server Tool
- Quick Reference — recommended tool sequences, including
search_catalog → describe_data → execute_logical_sqlandfind_matching_datasources → describe_data → execute_logical_sql - Oracle Analytics Cloud MCP Server: Bridging Enterprise Analytics and AI — Oracle's own product blog introducing the MCP server
Related: Unlocking Oracle Analytics Cloud with AI: MCP for Oracle Analytics · Oracle Analytics Meet AI series